
 – Buying and selling Methods – 17 April 2026")
📘 Market Construction Patterns – Full SMC Indicator Information (Ideas + Settings)
This doc explains the parameters of the Market Construction Patterns indicator in addition to the underlying buying and selling ideas utilized in its logic.
The indicator is obtainable for each MetaTrader 4 and MetaTrader 5 on the MQL5 Market:
⬇️ Market Construction Patterns (MT5): https://mql5.com/8cicg
⬇️ Market Construction Patterns (MT4): https://mql5.com/8chj4
📖 Contents:
1) Common · 2) Development · 3) Inside Construction · 4) Swing Construction · 5) Inside Order Blocks · 6) Swing Order Blocks · 7) Equal Excessive / Low · 8) Purchase/Promote Facet Liquidity · 9) Truthful Worth Gaps · 10) Inverse FVG · 11) Implied FVG · 12) Balanced Value Vary · 13) Liquidity Voids · 14) Opening Gaps · 15) Premium / Low cost · 16) Multi-Timeframe · 17) Increased Timeframe OHLC · 18) Periods · 19) Font Dimension · 20) Alerts
🔧 Common
Max bars to calculate – Defines what number of historic candles are processed by the indicator; setting this to 0 makes use of your entire historical past however could scale back efficiency, whereas decrease values enhance pace at the price of much less historic context.
Mode – Controls whether or not the indicator shows all historic drawings or solely the latest/energetic occasion of every sample, the place exhibiting solely energetic components ends in a cleaner chart targeted on present buying and selling situations.
Type – Defines the visible fashion of the indicator with out affecting its logic.

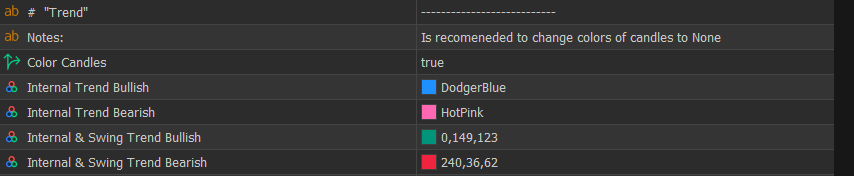
📈 Development
Shade Candles – Allows coloring of candles based mostly on development course, serving to to visually align trades with market bias.
Inside Development Bullish – Defines the candle shade when the inner (short-term) development is bullish.
Inside Development Bearish – Defines the candle shade when the inner (short-term) development is bearish.
Inside & Swing Development Bullish – Defines the candle shade when each inner and swing traits are bullish, indicating stronger directional alignment.
Inside & Swing Development Bearish – Defines the candle shade when each inner and swing traits are bearish.
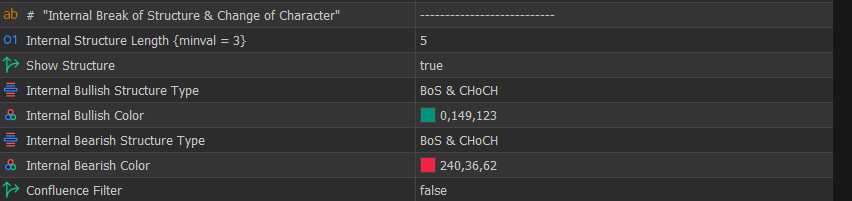
🔄 Inside Construction
Inside Construction Size – Defines what number of candles are required to verify inner highs and lows, the place decrease values present quicker indicators with extra noise, whereas larger values delay affirmation and produce cleaner construction; scalpers sometimes desire decrease values whereas swing merchants desire larger values.
Present Construction – Allows or disables inner BOS and CHoCH show.
Inside Bullish Construction Sort – Defines which bullish inner construction occasions are displayed.
Inside Bullish Shade – Defines the colour used for bullish inner construction.
Inside Bearish Construction Sort – Defines which bearish inner construction occasions are displayed.
Inside Bearish Shade – Defines the colour used for bearish inner construction.
Confluence Filter – Filters weaker indicators to cut back noise and enhance general sign high quality.
📌 Ideas – Market Construction (BOS & CHoCH)
A Break of Construction (BOS) happens when value continues the present development by breaking a earlier excessive in an uptrend or a earlier low in a downtrend, confirming continuation.
A Change of Character (CHoCH) happens when value breaks construction in the wrong way of the present development, signaling a possible shift in market course.
These ideas outline how the indicator interprets market construction.
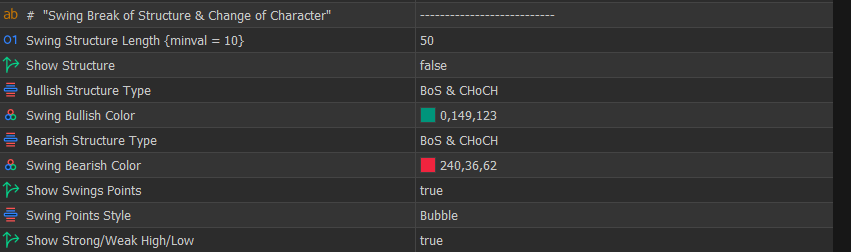
🔁 Swing Construction
Swing Construction Size – Defines what number of candles are required to verify swing highs and lows, the place decrease values produce quicker however noisier indicators and better values produce slower however extra dependable construction appropriate for larger timeframe bias.
Present Construction – Allows or disables swing BOS and CHoCH.
Bullish Construction Sort – Defines which bullish construction occasions are displayed.
Swing Bullish Shade – Defines the colour used for bullish swing buildings.
Bearish Construction Sort – Defines which bearish construction occasions are displayed.
Swing Bearish Shade – Defines the colour used for bearish swing buildings.
Present Swings Factors – Shows HH, HL, LH, and LL factors.
Swing Factors Type – Defines how swing factors are displayed.
Present Robust/Weak Excessive/Low – Highlights robust and weak liquidity ranges.
📌 Ideas – Robust vs Weak Highs/Lows
A robust excessive or low is a swing level that helps continuation of the present development, which means it’s much less prone to be damaged.
A weak excessive or low is a swing level that’s prone to be taken by value, because it doesn’t assist continuation.
- In an uptrend → lows are robust, highs are weak
- In a downtrend → highs are robust, lows are weak
Weak ranges are frequent liquidity targets, whereas robust ranges have a tendency to carry.
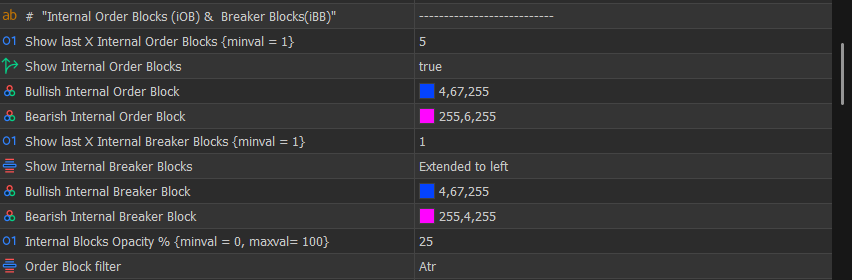
📦 Inside Order Blocks (iOB & iBB)
Present final X Inside Order Blocks – Limits the variety of latest inner order blocks displayed to cut back muddle.
Present Inside Order Blocks – Allows or disables inner order blocks.
Bullish Inside Order Block – Defines the colour used for bullish inner order blocks.
Bearish Inside Order Block – Defines the colour used for bearish inner order blocks.
Present final X Inside Breaker Blocks – Limits the variety of inner breaker blocks displayed.
Present Inside Breaker Blocks – Controls how breaker blocks are displayed.
Inside Blocks Opacity % – Controls visibility of blocks relative to chart readability.
Order Block filter – Specify tips on how to filter out small / greater order blocks.
📌 Ideas – Order Blocks & Affirmation
An order block represents the value space the place a short-term directional shift begins, sometimes the final candle in the wrong way earlier than an impulsive transfer.
On this indicator, order blocks are confirmed utilizing construction:
- A bullish order block is confirmed when value breaks the final confirmed excessive (BOS)
- A bearish order block is confirmed when value breaks the final confirmed low
This ensures that solely order blocks related to actual structural shifts are thought-about.
📌 Ideas – Breaker Blocks
A breaker block is shaped when an order block fails and value breaks by it, inflicting it to behave as a continuation zone in the wrong way.
📌 Ideas – Mitigation
Mitigation happens when value returns to an imbalance zone (comparable to an order block or FVG) to rebalance unfilled orders.
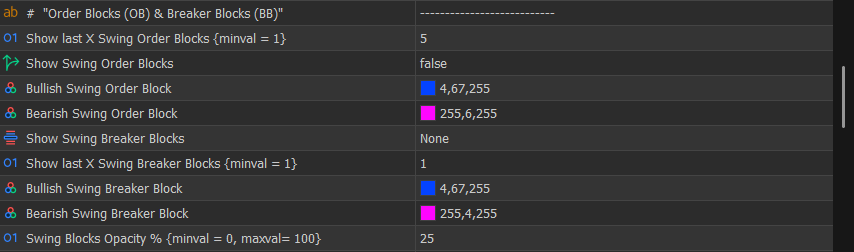
📦 Swing Order Blocks (OB & BB)
Present final X Swing Order Blocks – Limits displayed swing order blocks to take care of chart readability.
Present Swing Order Blocks – Allows or disables swing order blocks, which characterize larger timeframe zones.
Bullish Swing Order Block – Defines the colour used for bullish swing order blocks.
Bearish Swing Order Block – Defines the colour used for bearish swing order blocks.
Present Swing Breaker Blocks – Allows or disables swing breaker blocks.
Present final X Swing Breaker Blocks – Limits displayed breaker blocks.
Swing Blocks Opacity % – Controls visibility of swing zones.
⚖️ Equal Excessive / Low (EQH/EQL)
Equal Excessive/Low – Allows detection of equal highs and lows.
Bars Affirmation – Defines what number of candles are required to verify equal ranges, the place larger values produce stronger however fewer indicators.
Threshold – Defines how shut ranges have to be, the place larger values detect extra zones however with much less precision.

💧 Purchase/Promote Facet Liquidity (BSL/SSL)
Present BSL/SSL – Allows or disables liquidity ranges.
Present EQH-BSL/EQL-SSL – Highlights liquidity related to equal highs and lows.
BSL Shade – Defines the colour used for buy-side liquidity.
SSL Shade – Defines the colour used for sell-side liquidity.
📌 Ideas – Liquidity (BSL / SSL)
Liquidity represents areas the place cease orders are concentrated, sometimes above highs and beneath lows.
- Purchase-Facet Liquidity (BSL) varieties above highs
- Promote-Facet Liquidity (SSL) varieties beneath lows
Liquidity generally varieties round:
- Inside and swing highs/lows
- Equal highs and equal lows
- Earlier day, week, or month highs and lows
These ranges are focused as a result of they include clusters of cease orders.
Order blocks are derived from these identical structural highs and lows, so liquidity is inherently tied to construction relatively than being a separate idea.Massive contributors use these zones to execute positions effectively, typically inserting restrict orders towards triggered cease orders to enter trades.

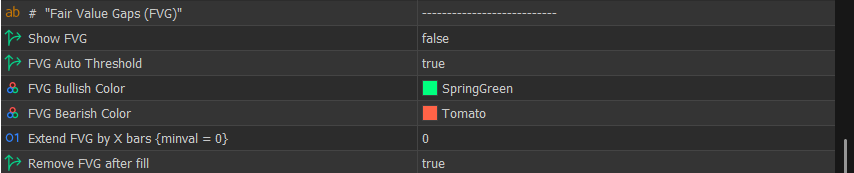
🟩 Truthful Worth Gaps (FVG)
Present FVG – Allows or disables truthful worth gaps.
FVG Auto Threshold – Filters weaker gaps robotically, the place enabling it produces cleaner charts and disabling it permits detection of all imbalances together with minor ones.
Prolong FVG by X bars – Extends gaps ahead for future interplay.
Take away FVG after fill – Removes gaps after mitigation.
📌 Ideas – Imbalance (Truthful Worth Gaps)
A Truthful Worth Hole (FVG) varieties when value strikes aggressively in a single course, creating a spot between candles the place little to no buying and selling exercise happens.
Technically, an FVG is recognized utilizing a three-candle sample:
- In a bullish FVG, the low of the third candle is above the excessive of the primary candle
- In a bearish FVG, the excessive of the third candle is beneath the low of the primary candle
This creates a visual hole between the primary and third candles, representing an space the place value moved too rapidly and skipped buying and selling at sure ranges.
The sort of motion is taken into account inefficient value supply, which means that not all orders have been correctly matched in the course of the transfer.
In consequence, value typically returns to those areas to rebalance the inefficiency, which is why FVGs are generally used as response zones.
💡 Sensible interpretation:
- Robust impulsive strikes usually tend to depart FVGs
- Bigger gaps are usually extra vital than smaller ones
- Auto-threshold filtering helps take away minor gaps and give attention to significant imbalances
- FVGs can act as assist in bullish situations and resistance in bearish situations
🔁 Inverse Truthful Worth Gaps (Inv-FVG)
Present Inv-FVG – Allows or disables the show of inverse truthful worth gaps, that are sometimes shaped when value invalidates a earlier imbalance and continues in the wrong way, typically appearing as continuation zones.
Inv-FVG Bullish Shade – Defines the colour used for bullish inverse truthful worth gaps.
Inv-FVG Bearish Shade – Defines the colour used for bearish inverse truthful worth gaps.
Take away Inv-FVG after fill – Removes inverse gaps after they’ve been mitigated, maintaining the chart targeted on energetic zones.
📌 Ideas – Inverse Truthful Worth Gaps
An Inverse Truthful Worth Hole (Inv-FVG) varieties when a beforehand recognized truthful worth hole is damaged and value strikes by it as a substitute of respecting it.
This habits signifies that the unique imbalance has failed and that market stress is robust in the wrong way.
In consequence:
- The unique FVG loses its validity
- The realm can act as a continuation zone relatively than a response zone
💡 Sensible interpretation:
- A revered FVG suggests potential reversal or response
- A damaged FVG (Inv-FVG) suggests continuation and power in the wrong way
This makes inverse gaps significantly helpful for confirming momentum and avoiding fading robust strikes.

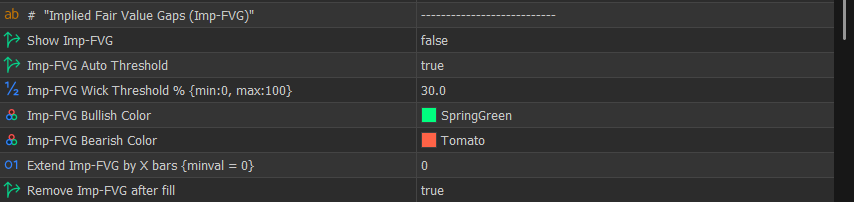
🧠 Implied Truthful Worth Gaps (Imp-FVG)
Present Imp-FVG – Allows or disables the show of implied truthful worth gaps, that are derived from wick-based inefficiencies relatively than customary candle gaps.
Imp-FVG Auto Threshold – Mechanically filters weaker implied gaps, serving to to give attention to extra significant value imbalances.
Imp-FVG Wick Threshold % – Defines how giant the wick have to be relative to the candle, the place larger values require stronger rejection and produce fewer however higher-quality indicators.
Imp-FVG Bullish Shade – Defines the colour used for bullish implied truthful worth gaps.
Imp-FVG Bearish Shade – Defines the colour used for bearish implied truthful worth gaps.
Prolong Imp-FVG by X bars – Extends implied gaps ahead to trace future interplay.
Take away Imp-FVG after fill – Removes the hole after it has been mitigated.
📌 Ideas – Implied Truthful Worth Gaps
An Implied Truthful Worth Hole (Imp-FVG) represents an imbalance that’s not seen as a conventional hole between candles however is as a substitute inferred from robust wick rejection.
These happen when:
- Value quickly strikes in a single course
- A major wick is left behind, indicating inefficient value supply
Though no traditional hole is current, the wick means that a part of the value motion was not absolutely traded.
💡 Sensible interpretation:
- Implied gaps are extra delicate than customary FVGs
- They typically act as exact response zones
- Increased wick thresholds assist filter weaker indicators and spotlight stronger rejection
These are particularly helpful for merchants in search of refined entries with tighter zones.
⚖️ Balanced Value Vary (BPR)
Present BPR – Allows or disables the show of balanced value ranges, which characterize areas the place opposing imbalances overlap and value turns into extra environment friendly.
BPR Bullish Shade – Defines the colour used for bullish balanced value ranges.
BPR Bearish Shade – Defines the colour used for bearish balanced value ranges.
Take away BPR after fill – Removes the balanced vary after value has absolutely traded by it, maintaining the chart targeted on energetic zones.
📌 Ideas – Balanced Value Vary (BPR)
A Balanced Value Vary (BPR) varieties when two opposing imbalances overlap, sometimes when a bullish and bearish truthful worth hole intersect.
This overlap signifies that value has partially rebalanced, creating an space the place shopping for and promoting stress are extra evenly matched.
In distinction to imbalances (FVG), which characterize inefficient value supply, BPR represents relative equilibrium.
💡 Sensible interpretation:
- BPR zones have a tendency to provide extra impartial or consolidative habits
- They will act as response areas however are typically much less directional than pure imbalances
- Value could pause, consolidate, or transition inside these zones earlier than the following transfer

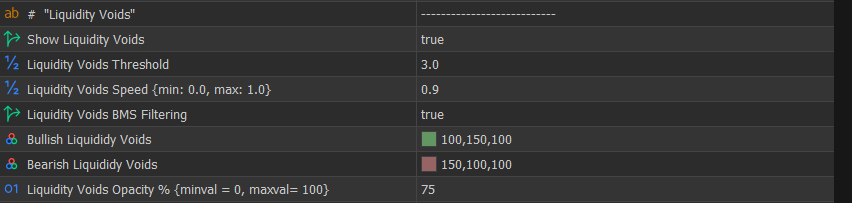
🌊 Liquidity Voids
Present Liquidity Voids – Allows detection of liquidity voids.
Liquidity Voids Threshold – Defines minimal transfer measurement.
Liquidity Voids Pace – Defines how impulsive the transfer have to be.
Liquidity Voids BMS Filtering – Shows solely voids that result in BOS or CHoCH, filtering out irrelevant strikes.
📌 Ideas – Liquidity Voids
A Liquidity Void varieties when value strikes extraordinarily rapidly in a single course over a number of consecutive candles, leaving little or no buying and selling exercise inside that vary.
Not like a Truthful Worth Hole (which is predicated on a selected 3-candle hole), liquidity voids are characterised by:
- Robust, consecutive candles in the identical course
- Massive displacement (impulsive motion)
- Minimal pullbacks or overlap between candles
This creates a large value space the place the market traded inefficiently as a consequence of lack of opposing orders.
Due to this imbalance in participation, these zones typically entice value later because the market seeks to rebalance and fill the inefficiently traded vary.
💡 Sensible interpretation:
- Liquidity voids sometimes point out robust momentum and institutional exercise
- Bigger and quicker strikes create extra vital voids
- Value could revisit these zones partially or absolutely earlier than persevering with
- When mixed with BOS or CHoCH (BMS filtering), voids turn out to be extra related as they’re tied to structural shifts relatively than random volatility
📌 Distinction Between FVG and Liquidity Void
- FVG → exact imbalance based mostly on a 3-candle hole
- Liquidity Void → broader inefficiency attributable to sustained impulsive motion
In easy phrases:
- FVG = localized imbalance
- Void = prolonged imbalance
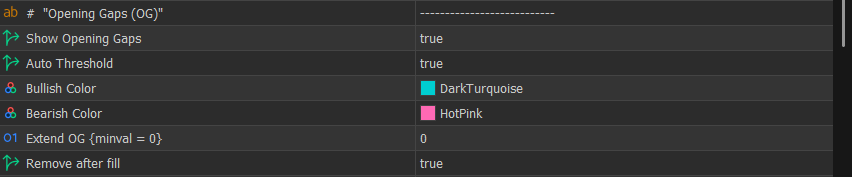
📉 Opening Gaps (OG)
Present Opening Gaps – Allows or disables the show of opening gaps, which happen when value opens considerably above or beneath the earlier shut, creating an imbalance between periods.
Auto Threshold – Mechanically filters smaller gaps, maintaining solely extra vital ones, leading to a cleaner chart, whereas disabling it permits detection of all gaps together with minor ones.
Bullish Shade – Defines the colour used for bullish opening gaps.
Bearish Shade – Defines the colour used for bearish opening gaps.
Prolong OG – Extends the hole ahead, permitting merchants to trace whether or not it stays unfilled and acts as a possible response zone.
Take away after fill – Removes the hole as soon as value has absolutely crammed it, maintaining the chart targeted on energetic imbalances.
📌 Ideas – Opening Gaps
An Opening Hole (OG) happens when the market opens at a special value from the earlier session shut, leaving a visual hole between the 2 costs.
This sometimes occurs as a consequence of:
- Information releases
- Financial occasions
- Adjustments in sentiment throughout closed market hours
As a result of no buying and selling happens inside the hole, it creates an inefficient value space, much like a good worth hole.
📌 Why Opening Gaps Matter
Opening gaps mirror a sudden shift in provide and demand between periods.
Since value “jumps” from one degree to a different with out buying and selling in between, the hole represents an space the place orders weren’t matched.
In consequence, value typically revisits these ranges to:
- Rebalance the market
- Fill untraded orders
- Affirm or reject the brand new value degree
This habits is why gaps regularly act as:
- Assist (in bullish situations)
- Resistance (in bearish situations)
📌 Sensible Interpretation
- Bigger gaps are usually extra vital than smaller ones
- Gaps aligned with development course typically act as continuation zones
- Gaps towards the development usually tend to be crammed rapidly
- Combining gaps with construction (BOS/CHoCH) and liquidity improves reliability
📌 Relationship with Different Ideas
- FVG → imbalance inside steady buying and selling
- Opening Hole → imbalance between periods
- Liquidity Void → prolonged impulsive imbalance
All characterize inefficiencies, however originate from completely different market situations.
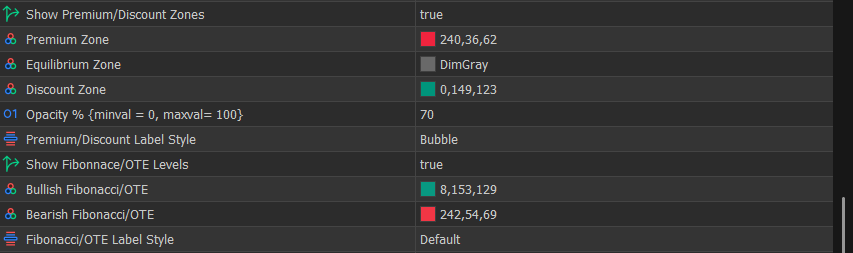
💰 Premium / Low cost Zones
Present Premium/Low cost Zones – Allows show of premium, equilibrium, and low cost zones.
Opacity % – Controls visibility.
Present Fibonacci/OTE Ranges – Allows Fibonacci-based entry zones.
📌 Ideas – Premium & Low cost
Premium and low cost are outlined utilizing the vary between a swing excessive and a swing low derived from market construction.
- Above the midpoint (50%) → premium zone
- Under the midpoint (50%) → low cost zone
These zones characterize relative worth inside the present value vary.
The idea is predicated on a basic market precept:
👉 Purchase low and promote excessive
- The low cost zone represents comparatively decrease costs inside the vary, the place shopping for alternatives are sometimes favored
- The premium zone represents comparatively larger costs, the place promoting alternatives are sometimes favored
This aligns with the concept of buying and selling close to assist and resistance, however as a substitute of mounted ranges, it makes use of a dynamic vary based mostly on present construction.
On this indicator, the vary is calculated utilizing swing highs and lows, making premium and low cost adaptive to present market situations relatively than static.
📌 Ideas – Optimum Commerce Entry (OTE)
The Optimum Commerce Entry (OTE) is a refined space inside the premium or low cost zones, sometimes outlined between the 62% and 79% retracement of the swing vary.
- In an uptrend → OTE is positioned within the low cost zone (purchase space)
- In a downtrend → OTE is positioned within the premium zone (promote space)
OTE is taken into account “optimum” as a result of it affords a extra favorable risk-to-reward ratio:
- Entries are taken at deeper retracements
- Cease-loss may be positioned past the swing level
- Targets stay aligned with development continuation
This permits merchants to:
- Threat much less relative to potential reward
- Enter nearer to areas the place establishments are probably re-engaging
📌 Why OTE Issues
Markets typically retrace earlier than persevering with a development, and never all retracements supply the identical high quality of entry.
OTE focuses on deeper pullbacks the place:
- Liquidity has typically been taken
- Imbalances (FVG, OB) could also be current
- Value is positioned at a extra favorable worth
This will increase the chance of:
- Higher entries
- Tighter danger management
- Increased reward potential
📌 Sensible Interpretation
- In an uptrend → search for buys in low cost, particularly inside OTE
- In a downtrend → search for sells in premium, particularly inside OTE
- Mix OTE with construction (BOS/CHoCH), liquidity sweeps, and imbalances for higher-probability setups
⏱ Multi-Timeframe (MTF)
FVG/IFVG Timeframe – Defines larger timeframe for imbalance detection.
Present MTF FVG – Allows larger timeframe FVG show.
Present MTF Implied FVG – Allows larger timeframe implied gaps.
Present MTF Inversed FVG – Allows larger timeframe inverse gaps.
Present MTF BPR – Allows larger timeframe BPR.
📌 Ideas – Multi-Timeframe Alignment
Increased timeframe defines bias, whereas decrease timeframe gives entries, and aligning each improves commerce high quality.

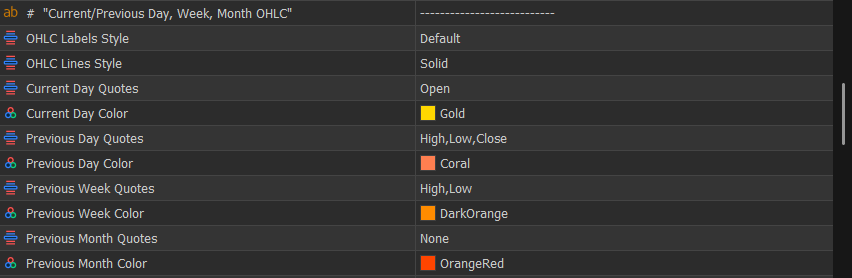
📊 Increased Timeframe OHLC
Present Day / Earlier Day / Week / Month Quotes – Shows key reference ranges used as assist, resistance, and liquidity targets.
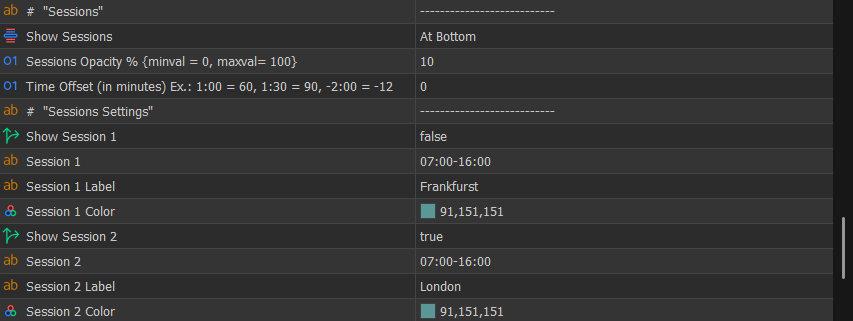
🕒 Periods
Present Periods – Shows buying and selling periods as packing containers across the candles or in a timeline fashion on the backside of the chart, permitting visualization of when particular market intervals happen.
Time Offset – Adjusts session time to match your dealer time. Use this parameter to shift all periods concurrently as a substitute of modifying every session individually.
Within the Market Construction Patterns indicator, you’ll be able to outline as much as 12 customized time intervals. By default, these are configured to characterize main foreign exchange periods, silver bullet ranges, and kill zones.
📌 Ideas – Foreign exchange Periods
The foreign exchange market operates 24 hours a day and is split into a number of buying and selling periods, every with distinct traits.
On this indicator, periods are separated into the next key intervals:
- Sydney
- Tokyo (Asian session)
- Frankfurt (pre-London session)
- London (European session)
- New York (American session)
Every session contributes otherwise to market habits:
- Sydney → low volatility, transition from earlier buying and selling day
- Tokyo → typically consolidative, typically builds liquidity
- Frankfurt → early European exercise, regularly units up liquidity earlier than London
- London → excessive volatility, robust directional strikes and frequent construction breaks
- New York → continuation or reversal, typically with excessive liquidity and main strikes
💡 Word:
Frankfurt is usually neglected or grouped with London, nevertheless it performs an essential position as a pre-London session, the place liquidity is usually constructed or partially taken earlier than the principle London transfer.London and New York periods are sometimes probably the most related for energetic buying and selling as a consequence of their larger liquidity and volatility.
📌 Ideas – Kill Zones
Kill zones are particular time home windows inside buying and selling periods the place liquidity and volatility are anticipated to extend considerably.
They’re generally related to:
- Session opens
- Session overlaps (e.g., London–New York overlap)
Throughout these intervals:
- Liquidity enters the market
- Cease orders usually tend to be triggered
- Impulsive strikes and construction shifts (BOS/CHoCH) happen extra regularly
💡 Sensible use:
- Focus buying and selling exercise throughout kill zones
- Keep away from low-volatility intervals the place value is much less predictable
📌 Ideas – Silver Bullet
The Silver Bullet refers to a selected intraday time window (generally inside the New York session) the place high-probability setups are anticipated to happen.
This idea is predicated on the concept that:
- Liquidity has already been constructed earlier within the day
- Value strikes into key ranges (liquidity, FVG, OB)
- A exact entry alternative varieties inside a short while window
The technique sometimes combines:
- Liquidity sweep
- Entry inside an imbalance (FVG / OB)
- Alignment with general construction
💡 Sensible use:
- Deal with exact entries inside outlined time home windows
- Mix with premium/low cost and liquidity ideas for larger chance
📌 Why Periods Matter
Market habits modifications relying on time of day as a result of participation modifications.
Periods and time-based intervals assist reply:
👉 When is the market more than likely to maneuver?
By combining periods with:
- Construction (BOS/CHoCH)
- Liquidity (BSL/SSL)
- Imbalances (FVG, OB)
…merchants can enhance each timing and commerce choice.
🔤 Font Dimension
Defines label sizes for various components, permitting customization with out affecting logic.
🔔 Alerts
Terminal Popup / Push / Electronic mail – Defines how alerts are delivered.
Alert Circumstances – Permits enabling alerts for construction, liquidity, imbalances, and interactions.
📩 Assist & Further Info
In case you have any questions concerning the indicator or if any idea on this doc isn’t clear, be at liberty to get in contact. Suggestions and questions are at all times welcome and assist enhance each the instrument and its documentation.
You too can seek advice from the product pages for extra particulars, updates, and person suggestions:
⬇️ Market Construction Patterns (MT5): https://mql5.com/8cicg
⬇️ Market Construction Patterns (MT4): https://mql5.com/8chj4