

An vital word
Earlier than you do something, be sure to’ve obtained an unlocked Google Pixel. In the event you purchased your cellphone via a service like AT&T, Verizon, or T-Cellular, it is possible your cellphone is locked and can’t be used for this information. In case your cellphone is not unlocked and you are not capable of get your service to unlock it, this information will not be of any use.
Common software program updates are fantastic. Google Pixel telephones replace each month with new safety patches and embody Pixel Characteristic Drops as soon as every quarter. Despite the fact that these patches undergo a number of testing earlier than being rolled out to the general public, a nasty one will pop up each on occasion, inflicting issues that did not exist earlier than.
That is precisely what occurred with the March 2025 Google Pixel replace. Customers have reported all types of points, from display brightness issues to damaged haptics, community connectivity points, and extra. Google has a web-based flash software that makes going again “straightforward,” however it takes a good bit of labor to get there when you’ve by no means carried out it earlier than. As at all times with firmware flashing, I would not suggest doing this if the Pixel you need to downgrade is the one cellphone you could have obtainable to make use of.
In the event you nonetheless need to take the possibility, we suggest charging your cellphone to 100% and backing issues up earlier than going ahead. To get flashing, you may want a pc, USB cable, and developer choices enabled in your Pixel cellphone.
Again it up
Most definitely, you’ve got already obtained Google backup enabled in your cellphone, however it’s at all times good to verify earlier than you do one thing drastic. For this step, you may have to have Google One in your Google account. All Google Pixel telephones include a Google One trial, so it is possible you should still have a free trial obtainable even when you do not already pay for it.
Here is methods to confirm you’ve got obtained Google One backup enabled in your Google Pixel.
1. Open Settings. You’ll find the icon in your app drawer or by swiping down twice on the standing bar.
2. Choose “Again up or copy knowledge” from the record.
3. Ensure that the proper Google account is chosen on the prime.
4. Click on the slider to allow Google One backup.
5. Choose Backup Now to carry out a right away backup. We suggest placing your cellphone on the cost whereas it performs the backup.

Google One Backup will mechanically embody app knowledge for all of the apps you could have put in, MMS and SMS messages, name historical past, system settings, and different Google account knowledge like contacts and calendar.
Your images must also be backed up via Google Pictures, however which will have to be carried out individually. Here is methods to backup your images and movies via Google Pictures.
If you do not have Google One or simply need to make sure that a backup of your system knowledge is in additional place than one, our final information to Android backups provides you with a number of choices for methods to accomplish this.
Get your cellphone prepared
Rolling again an replace is not a easy click on of a button, sadly, however Google’s Android Flash Device makes it straightforward sufficient as long as you could have a pc to plug your cellphone into. First, you may have to allow developer choices and OEM unlocking. Comply with these steps for that:
1. Open Settings. You’ll find the icon in your app drawer or by swiping down twice on the standing bar.
2. Scroll right down to and choose About cellphone.
3. Scroll to the underside and faucet Construct quantity seven occasions till you see the toast notification that developer choices have been enabled.

4. Return to the primary settings window and choose System from the record.
5. Scroll right down to Developer choices.
6. Discover USB debugging below the “Debugging” part and allow it.
7. Scroll again up and allow OEM unlocking. Your cellphone might ask you to reboot after enabling this.

Hop in your pc
For this part, I am utilizing a Home windows 11-based PC, however the directions must be related for different desktop working methods. To finish the flashing course of, you may want a USB cable that may join your cellphone to your PC. The one which’s included along with your Google Pixel will work as long as your PC has a USB-C port. Comply with these steps to get began:
1. Navigate to the official Google Pixel manufacturing unit pictures web page.
2. Choose your system from the record on the fitting. Mine is a Google Pixel 9 Professional XL.
3. Scroll right down to the construct you need to flash. For this tutorial, I am utilizing 15.0.0 (AP4A.250205.002, Feb 2025). MAKE SURE you’re choosing the fitting construct. If you do not know which one is the fitting one or are uncertain, I might suggest stopping now and ready for Google to roll out a set replace.
4. Click on the Flash hyperlink subsequent to the construct.
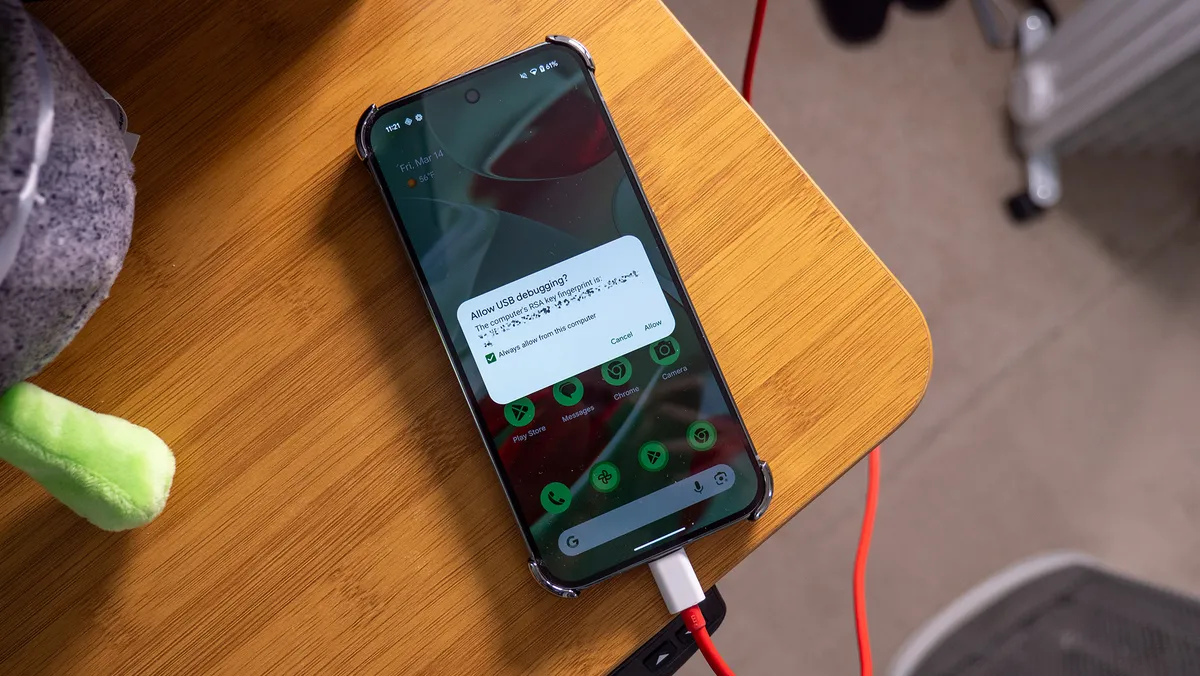
5. Choose Enable ADB entry on the window that seems.

6. Join your cellphone to your pc utilizing a USB-C cable.
7. An USB Debugging immediate will seem in your pc. Choose the All the time permit from this pc checkbox, then click on the Enable button.
8. Again in your pc, scroll down and faucet Add new system.
9. Choose your system from the record after which click on join.
10. Scroll down and choose the containers for Wipe system and Lock bootloader.
11. Faucet the Set up construct button.

At this level, your cellphone ought to have rebooted and is now in a debug menu. With a view to proceed, you may have to faucet the Reselect system button and choose your cellphone from the record.
Roll again that replace
Now that your cellphone is within the restoration menu, you may have to unlock the bootloader. The Android Flash Device provides you a warning that persevering with will wipe all knowledge out of your system. In the event you do not need to try this, now is a good time to name it quits. In any other case, faucet the Begin button.

Your cellphone’s show will now ask you to verify unlocking the bootloader. Click on the Quantity up button to alter the motion to Unlock the bootloader. Click on the energy button to pick out the unlock motion. Your cellphone might reboot.

As soon as the bootloader has been unlocked, the Android Flash Device ought to mechanically start the flashing course of. This may take half an hour or so to complete, so hold your pc awake and your cellphone plugged into it. Your cellphone will appear to be this picture the whole time:

Finalizing the method
As soon as the method has been accomplished, your cellphone will reboot and the bootloader will have to be locked once more. In your pc, you may be introduced with a dialog to lock the bootloader once more. Faucet the beginning button if you’re able to proceed.
1. In your cellphone, click on the Quantity up button to alter the motion to Lock the bootloader.
2. Click on the facility button to lock the bootloader. Your cellphone will reboot.

From right here, your cellphone must be good as new and again to the Android model you chose. As soon as you’ve got set the cellphone up, go forward and re-enable developer choices, then disable computerized updates from the developer choices record. It will hold your Pixel from mechanically updating to the March patch.
Moreover, you may need to disable OEM unlocking from the record to verify every thing is locked and safe. In any other case, issues like Google Pay might not work correctly, and you may be susceptible to safety dangers.